Building a Tall Case Clock at the Headley's


I started with the bracket feet.
The front feet are mitered and splined.

After band sawing, final shaping was done by hand.

The rear feet were dovetailed and band sawn.

The base components were dovetailed...

and assembled

The front frame was mortised...

and assembled

Bearing panel was installed

Router mounted on a pivot board

Cut was made using multiple cuts

Finished cut ready for sanding

Practicing the mitered lap joint used in the door
(poplar)

Shaping the lower part of the Quarter Column

Using a Spoke Shave, the right side is rounded

The quarter column is mounted in a jig on the lathe
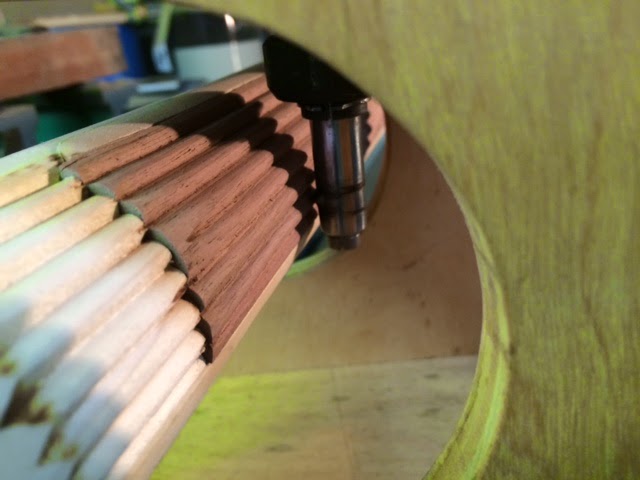
The column is reeded using a router mounted in a jig

Jig mounted on the lathe

Final fitting of the reeded quarter column

Door frame is complete

Testing the fit on the case

Cove mould is fitted to the top of the base

Cove mould (2 piece) is fitted to support the hood

Shell Panel for the Clock Base fitted in a Jig

Field is lowered with a Router

Lower edge of Shell is routed

The carving begins

Carving complete and Panel is glued to Case

Another view of the lower case

After a 5 year pause....work resumes
Here I am working on lower part of the hood

Dry fitting the mask for the clock face.
This is 1/4" thick with 1/8" lap joints

Mask in place for a test fit

Laying out dovetails for the sides of the hood

Hood dry fitted

Work begins on the scroll board


Testing the fit of the moulding


Parts for the Hood Door milled and fitted.
Mitered Half Laps

Dry fitted

In place for final fitting

Fitting the crown mold


Hood is nearly complete

In place

Painted Face fitted